
- New Products
- Exclusive Gear
- Bushcraft Gear
- Containers
- Cooking
- Fire
- First Aid
- Food Gathering
- Knives & Tools
- Knife Collectors Corner
- Light
- Logo Gear
- Misc. Items
- Navigation
- Packs, Pouches & Bags
- Personal Care
- Repair Gear
- Shelter & Protection
- Signaling
- Urban Survival
- Water
- Writing Gear
- John's Books
- Bargain Bin

Boxing An Object
There will be times when you are navigating when you'll come to an obstacle that you either don't want to proceed through, such as a swamp or pond, or a physical feature you want to go around, such as a cliff. But if you just walk around it, how do you stay on your designated course?
 Sometimes you will come to an obstacle that you just have to go around.
It is called Boxing An Object, and this is how it works. When you come to the obstacle, stop and try to determine if it is best to go around to the left or right. You may have to mark the position you stopped, and explore a little in each direction (not too far, you don't want to be unable to find your way back to your marked position).
Once you determine the direction you want to go, in the case of diagram below, you were heading at a bearing of 150 degrees, and you decide to go right passed the obstacle. Add 90 degrees to your original bearing, and you should now be facing 90 Degrees to the right. You will then follow that bearing, counting paces until you have passed the obstacle.
Once you have passed the obstacle, stop and record the amount of paces you took. Then subtract 90 degrees from your bearing so that you are now back at your original direction of travel, 150 degrees. You will now be facing your original direction of travel, 150 degrees, and can now follow that bearing, WITHOUT counting your paces, until you have again passed the obstacle.
Once you have passed the obstacle, stop and subtract 90 degrees from your bearing, being 60 degrees, turning left this time. Now follow that bearing, counting the same amount of paces that you counted out the first time. When you reach the same amount of paces, stop.
You will now add 90 degrees to your last bearing, and you should be back at your original bearing of 150 degrees. If you performed these calculations carefully, and were careful with your pacing, you will also be back on your original direction of travel, heading towards your destination.
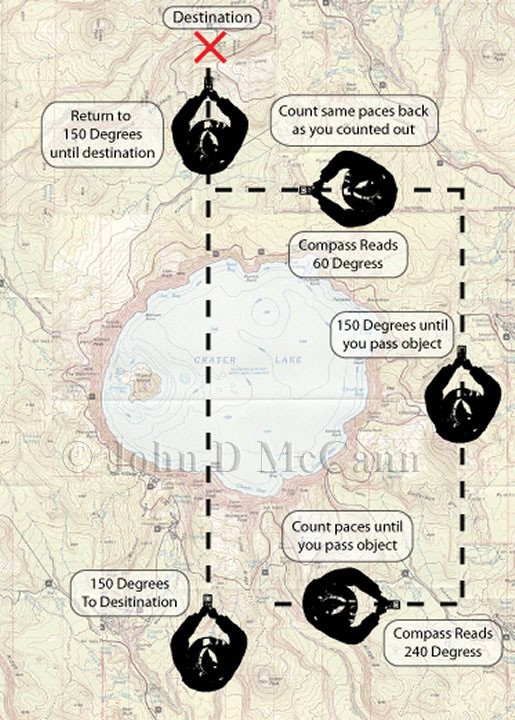 This diagram shows the boxing procedure as explained above.
Keep in mind that you might not always have to box an object. If you can clearly see the other side of the obstacle, you may be able to continue on you bearing without boxing the object. I recall during a navigation class we were teaching, we purposefully had a bearing the students were following end up at the center of a small pond. We didn't say anything at first. The students talked for a few minutes and started to box the small pond, in order to continue on their prescribed direction of travel.
I came up and asked what the students were doing? They indicated they couldn't continue straight, so as they were taught, they were boxing the object so they could continue. I asked if they could easily see the the other side of the pond? They indicated that they could. I asked why they didn't have another student go around to the other side of the pond and aim on them? Have that student move left or right, using hand signals, until they were on the prescribed bearing. Have them stand in place and have all the other students just walk around the pond to that position. If they wanted to be real safe, have one student stay at the original spot, and when they got around the pond to the student marking the bearing spot, turn around and check if they were on course using a back bearing to the original spot they stopped.
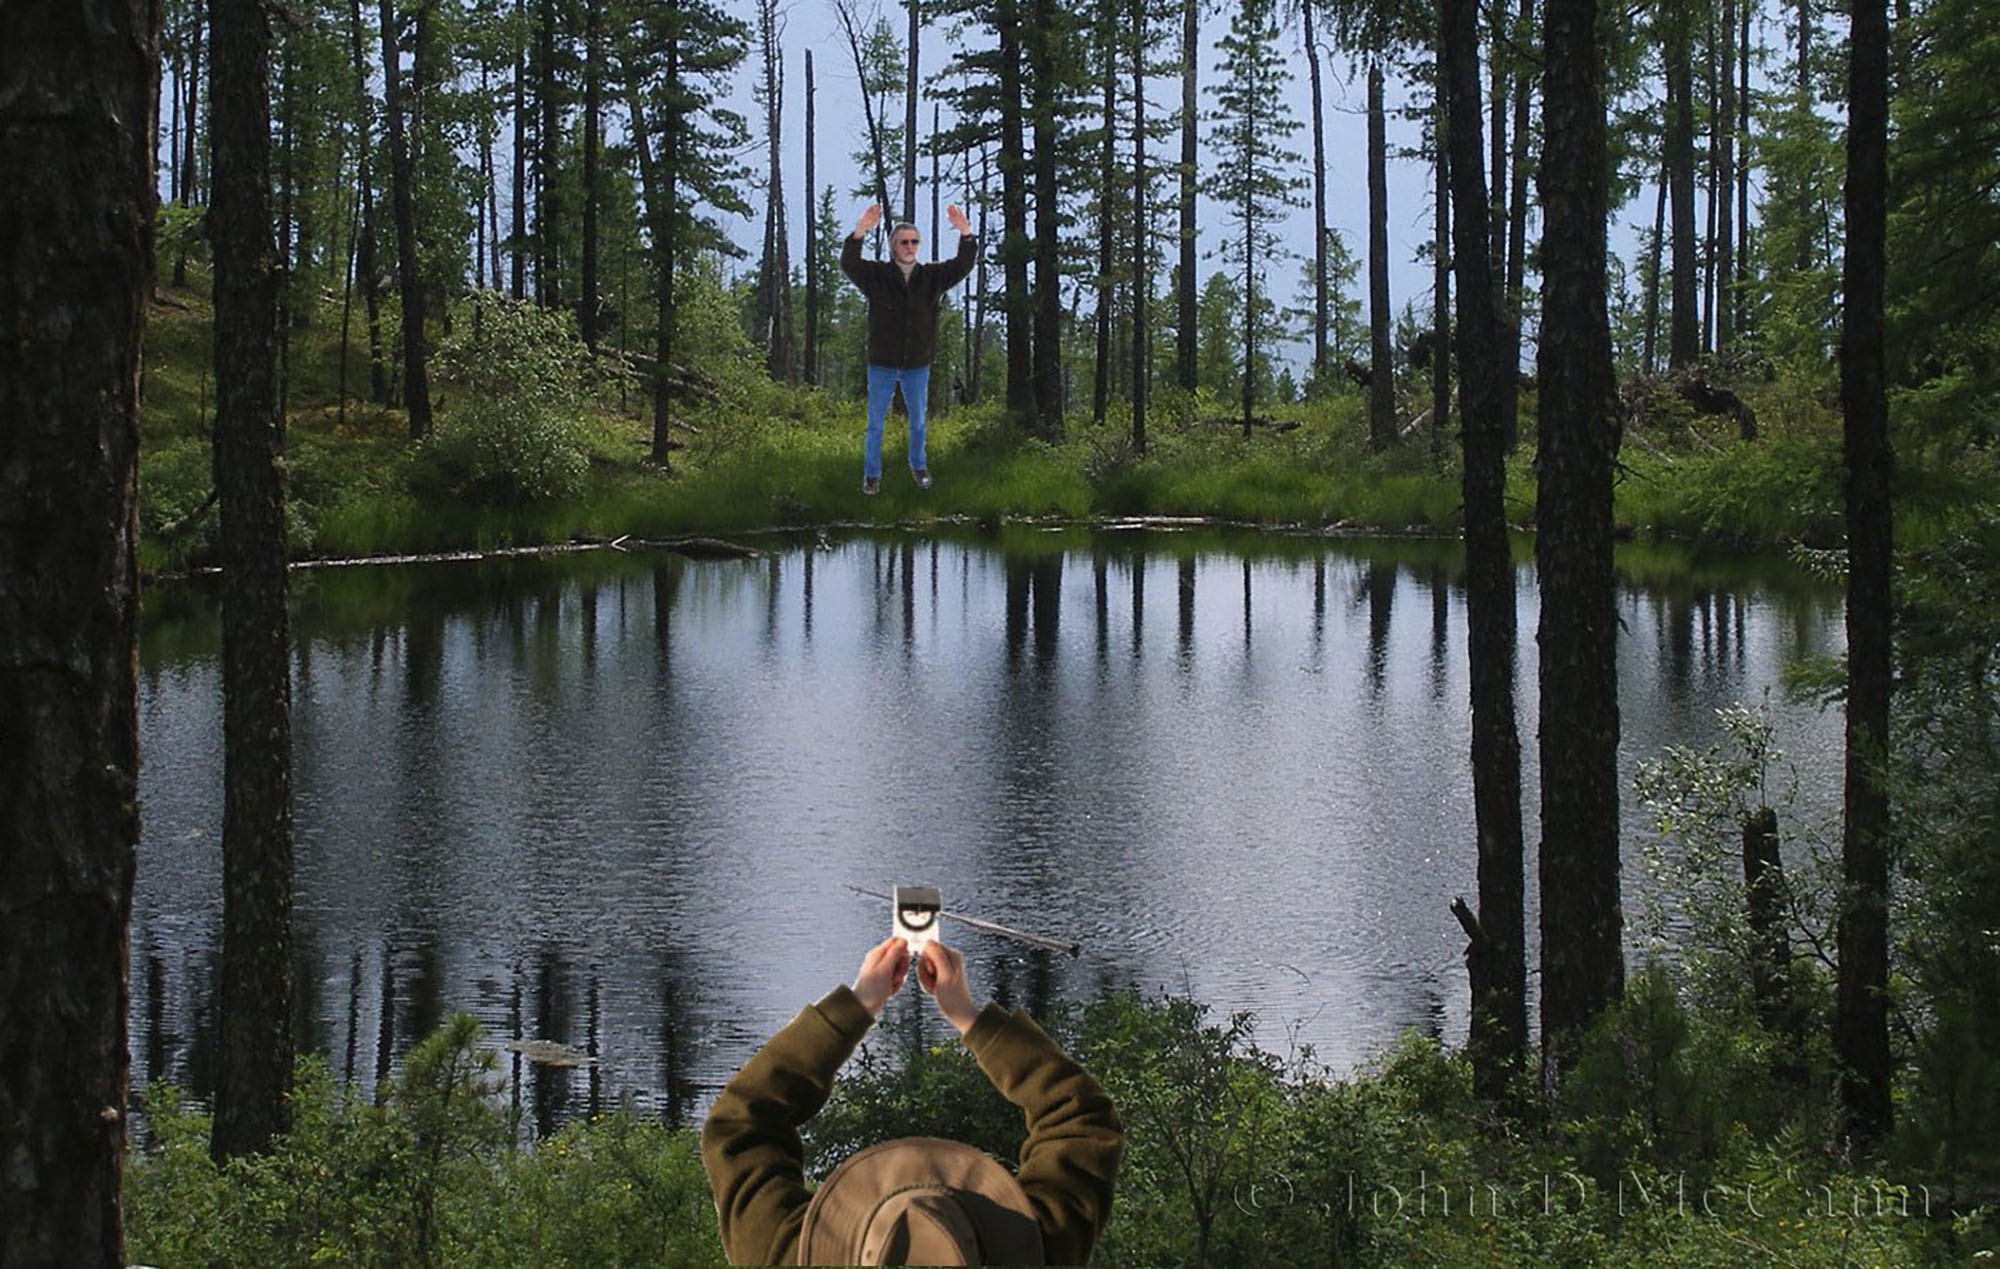 This shows shooting across a small pond using another person so it does not have to be boxed.
As you can see, if you have another person with you, and you can see the other side of an obstacle, you can send that person to the other side of the obstacle and you can use them to aim on. If you don't have another person, you could mark your position with something you can see from the other side, maybe a makeshift tripod, etc. Then go to the other side of the obstacle and shoot a back bearing to that marker you left. Move left and right until the red end of the magnetic needle is boxed in the red end of the orienting needle. You are now on line with your original bearing. Turn around and continue on your original bearing.
Of course, as I explained in my article "Staying Straight - Avoiding Lateral Drift" you don't have to actually move the dial on your compass to shoot a back bearing. If you are using a base-plate compass, there is an easier way. I have always believed that the more often you turn the rotating housing with dial, the greater chance you have of setting an inaccurate bearing. Therefore, with a base-plate compass, why calculate at all. Let's say that you are traveling at a main bearing of 280 degrees. Therefore the red end of the magnetic needle is boxed in the red end of the orienting needle. When you need to check your back bearing, simply turn around, remaining on your direct line of travel, and place the red end of the magnetic needle in the black end of the orienting arrow. The black end of the orienting needle is exactly 180 degrees from the red end. This prevents your having to turn the rotating housing from your main bearing, every time you want to check your back bearing while on the move.
We hope you enjoyed this article and will help support our efforts by checking out our products. As always, Be Prepared To Survive!
Copyright © 2016 by John D. McCann