
- New Products
- Exclusive Gear
- Bushcraft Gear
- Containers
- Cooking
- Fire
- First Aid
- Food Gathering
- Knives & Tools
- Knife Collectors Corner
- Light
- Logo Gear
- Misc. Items
- Navigation
- Packs, Pouches & Bags
- Personal Care
- Repair Gear
- Shelter & Protection
- Signaling
- Urban Survival
- Water
- Writing Gear
- John's Books
- Bargain Bin

Making A Leather Holster

There are many leather holster makers out there, and although I find most are adequate for the purpose, they just don’t have the finish of a custom holster. Being I make all of my own custom leather sheaths for my knives, I like making holsters to match my sheaths.Making your own holster can be time consuming, but the finished product is one you can appreciate and be proud of. The following article will address making a handmade custom leather holster, in this case, for a Smith & Wesson 640 revolver. It should be noted that holsters for semi-automatic pistols are slightly easier, as they are flat, but all the steps are the same and still a lot of work.Before getting started, you will need some tooling leather and a few tools. These can be purchased from Tandy Leather Company. The tooling leather I purchase is the premium double shoulder, trimmed. I recommend that you always ask that the flesh side be smooth and dense, not fuzzy and suede like. The weight for holsters should be between 6-10 oz.: I prefer 7-8 oz.
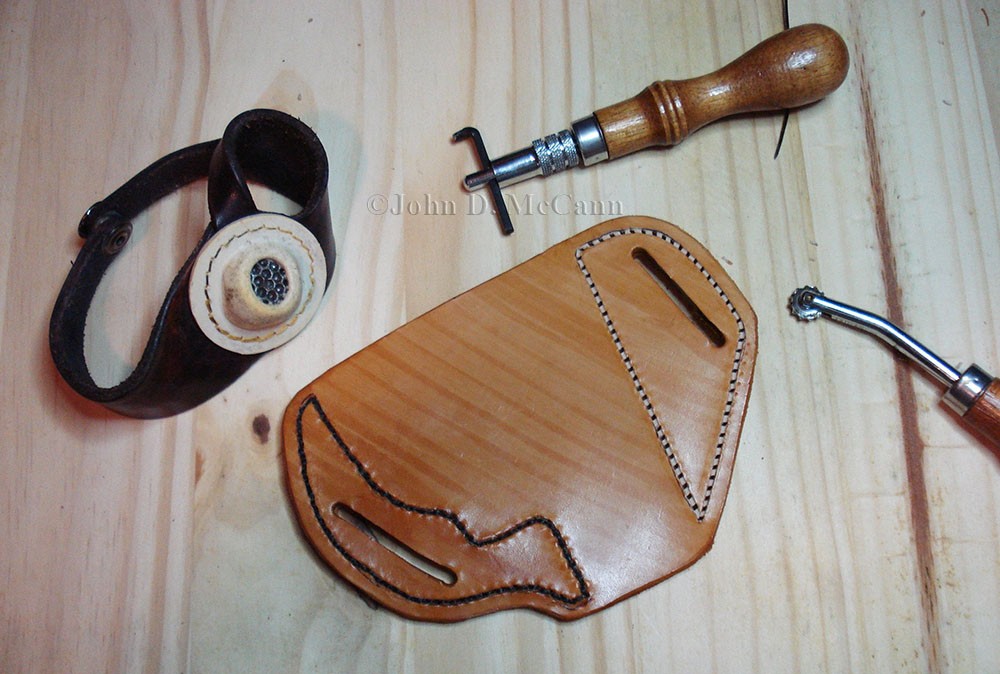
In the first photograph below you can see the minimum tools I recommend for making holsters. It includes a rawhide mallet, and a leather sewing palm. The other tools include a stitching awl, an edge beveller, a pricking wheel, an adjustable groover, and two harness needles, a pair of leather shears as well as a sharp knife. For cutting belt loops I also use a leather punch to ensure the ends of the loops are nicely rounded. I then cut between the punches with the sharp knife razor knife. I also recommend having a good grade leather contact cement or leather weld, as well as some leather dye and edge cote for the final product.
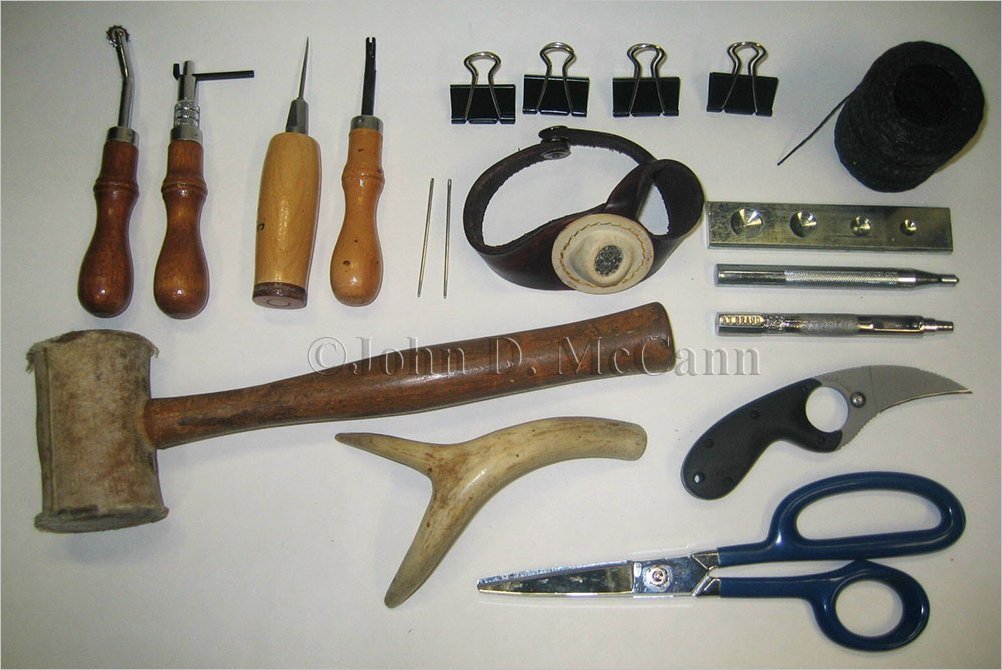 This shows the minimum tools I recommend for making holsters.
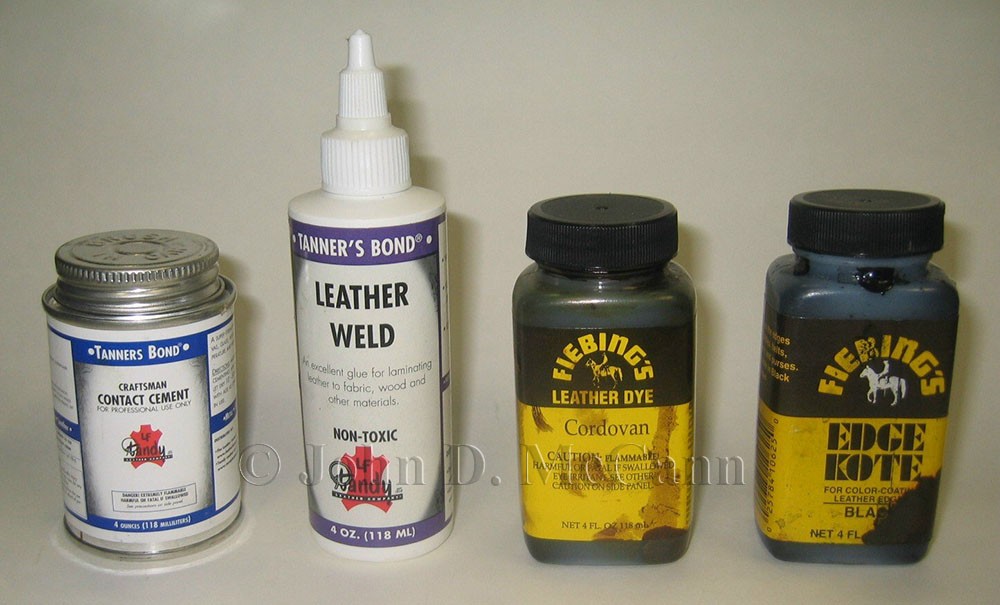 This shows some leather contact cement, leather weld, dye and edge cote.
I begin by making a cardstock template using file folder cardstock. This is probably the most difficult part and is the most crucial. I’ll try to explain… first you must lay the gun down on its side, and trace around it (the part that will be in the holster), leaving additional room for molding. I generally leave the additional dimension of half the thickness of the gun. As an example, if the thickness is 3/4 “, then the tracing around the gun should have and additional 3/8 “space around the gun. This will allow the leather to mold half the distance in each direction when molding is accomplished.
At this point, cut out a large section of cardstock (larger that the desired holster), which includes your trace lines, and have someone hold it up to the position you will be wearing it on your belt. You need to draw belt loops in the area that you want belt loops, making sure that you have the angle you want in the completed holster. You now need to freehand draw the completed holster. Once this is complete, you can draw the remaining stitch lines around the outside of the template, staying about 3/16 “ – 1/4 “ in from the edge.
Now that the primary drawing is complete, you can cut the basic shape out with scissors. Now you need to carefully cut a very narrow grove around the stitch lines (I use an X-Acto type knife) about 3/32 “ wide. This allows you to trace the stitch lines on the leather with a pen. Don’t make a complete cut around the entire stitch line, or the piece of cardstock will fall out. I cut sections about one inch long, then leave a 1/8 “ cross section. This can be observed in Photograph #2. Next, cut out the belt loop slots, and lastly (and this is important) right “Front” on the top of the template. I also write the make and model of the gun, as I keep my templates filed in the event I need to make another at a later date.
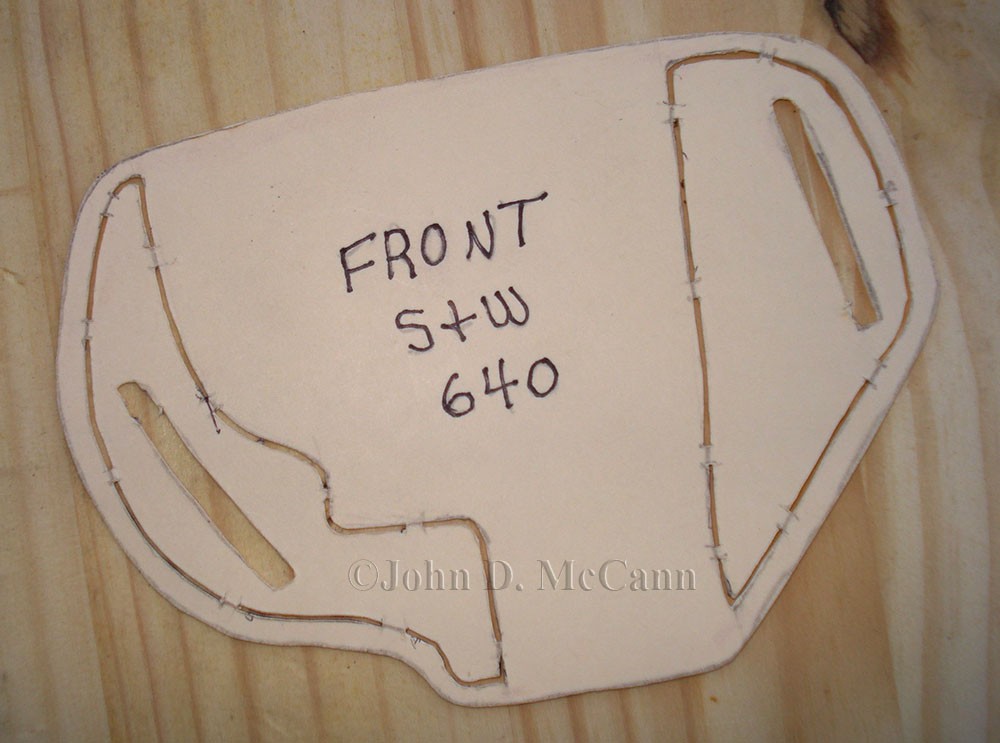 This shows the cardstock template with a grove cut for the stitch lines.
The next step is to trace the outside of the template onto the smooth side of your leather. You need to trace the template with the “Front” side up and then again with the back side up. If you forget this step, when you go to glue the front and back together, you will have two fronts and no back…. Hate it when that happens.
Once the outside of the template has been traced, you can carefully cut out the shape with either leather shears, or a sharp knife. Do not cut out the belt slots at this time. It will be done after gluing.
Now you should have both a front and back side of the holster, with the shiny side out on each. Now is the time to dye each side before gluing. Once you glue, the dye will not stick well to the leather, or will leave a yellow, unsightly spot. Dye both shiny sides as well as the outside edge. When the dye dries, you can begin gluing.
Before gluing, trace the stitch lines on the INSIDE of both halves. This makes sure that you only place the glue on the area that the gun will not be inserted. If you get glue on the insert area, you will not be able to insert the gun during the molding stage. I use either Craftsman Contact Cement, or Leather Weld, both by Tanner’s Bond and also available from Tandy Leather Company. Put the glue on both sides of the inside, in the appropriate area, and then press the two pieces together. You can place a board on the top and set a weight on it until the glue dries.
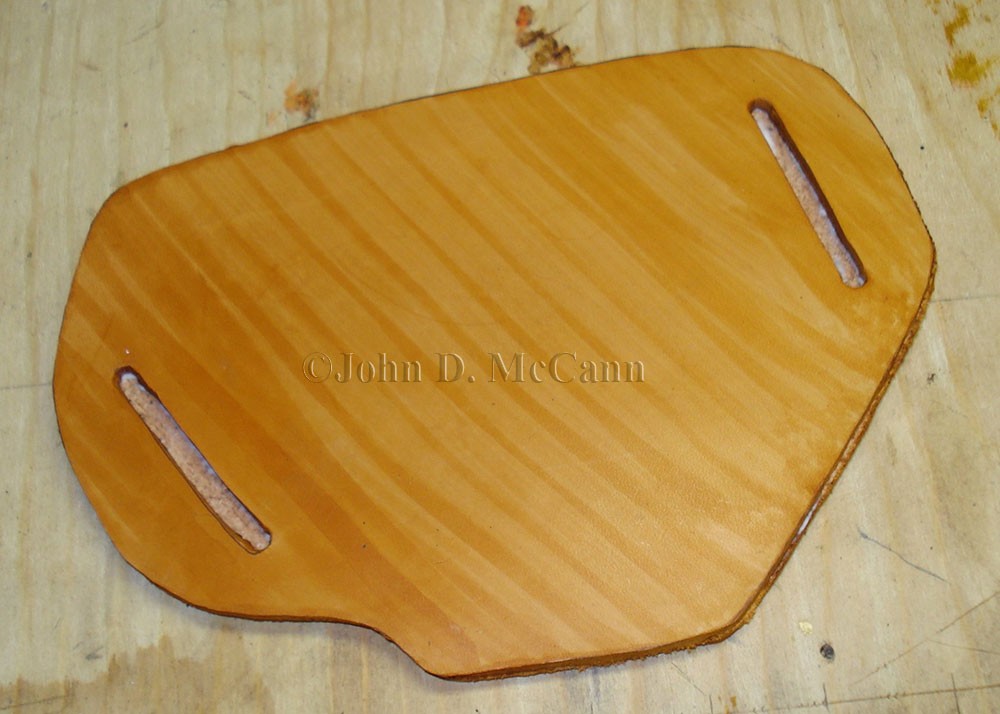 A view of the front and back of the holster dyed and glued together.
Once the two pieces are glued together you can cut out the belt slots. For really tight spots, such as the ends of the belt loops, I use a leather hole punch, and then cut between the holes with the X-Acto knife. This is also the time to bevel the edge of the leather. Using your edge beveller, round off the outside edge, all the way around the outside of the flat holster, on both sides. Don’t go crazy here; just a slight bevel takes off the 90 degree edge and slightly rounds the edge. You can also bevel the belt slots, although it is difficult at the tight ends of the slots.
The next step is to trace the stitch lines on the front of the holster blank. Using your groover, cut a groove around the stitch lines. Do not make the groove too deep, but deep enough so when you stitch it together the stitches will not stick up above the leather.
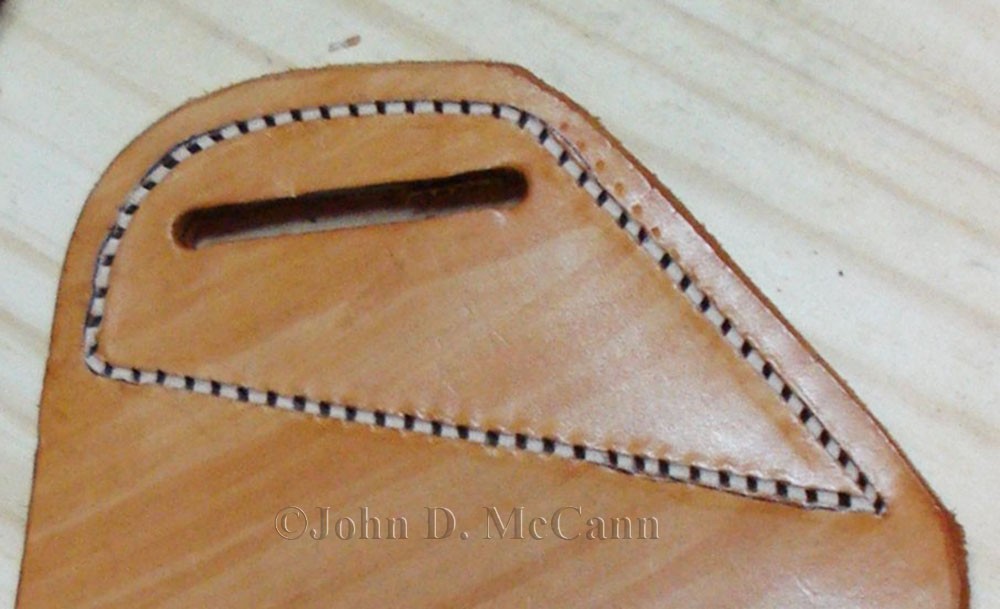
 A view of the belt loops cut out and the stitch lines traced from the cardstock template.
Once the groove is complete, lightly dampen the groove and take your pricking wheel to mark inside the groove the proper spacing for your stitches (I use 7 stitches per inch). You do this by rolling the pricking wheel inside the groove. When completed you should see a small impression where each stitch hole must be punched with a stitching awl.
Now that the groove is marked where your stitches will go, you need to hand punch each stitch hole with a stitching awl and rawhide mallet. You need to be real careful on this step! You must ensure that the awl stays straight up and down or your hole will not be spaced the same on the opposite side of the leather. Use an old piece of leather under the area you are punching, so you do not ruin the point of your awl.
 A view of one end with the grove cut and stitch holes punched.
It is time to start stitching. You will need two harness stitching needles and waxed thread (I use waxed Nylex thread, available from; you guessed it, Tandy Leather Company). To calculate the length of thread, measure the overall stitching distance of a section, multiply by four, and then double that. This is longer than I have seen recommended, but it works fine for me, and gives you plenty of extra length on each end to pull with. I often have thread left over, which is better than running short.
Thread one needle on each end of the thread. To start sewing, pick a hole to start. Since you will be backstitching at the end, I normally select an area of stress, such as the inside area next to the gun. This will provide a couple of double stitches in that area upon completion.
Push one needle through the chosen hole and continue to pull the thread through until both needles are side by side. At this point, you are at the center of the thread. Now, with the Sewing Palm on your hand push the needle on the front side through the next hole in line (it doesn’t matter which direction you go around). Then, using the needle on the other side, push that needle through the same hole that the front needle just came through, from the opposite direction (back side). The needles should now be reversed, with the original front needle at the rear, and the back needle at the front. Pull the thread on both sides firmly and evenly. Do not pull too tight, as you want the stitch snug, but not so tight that it cuts the leather. Continue in this manner until you are back where you started… I didn’t say this would be easy!
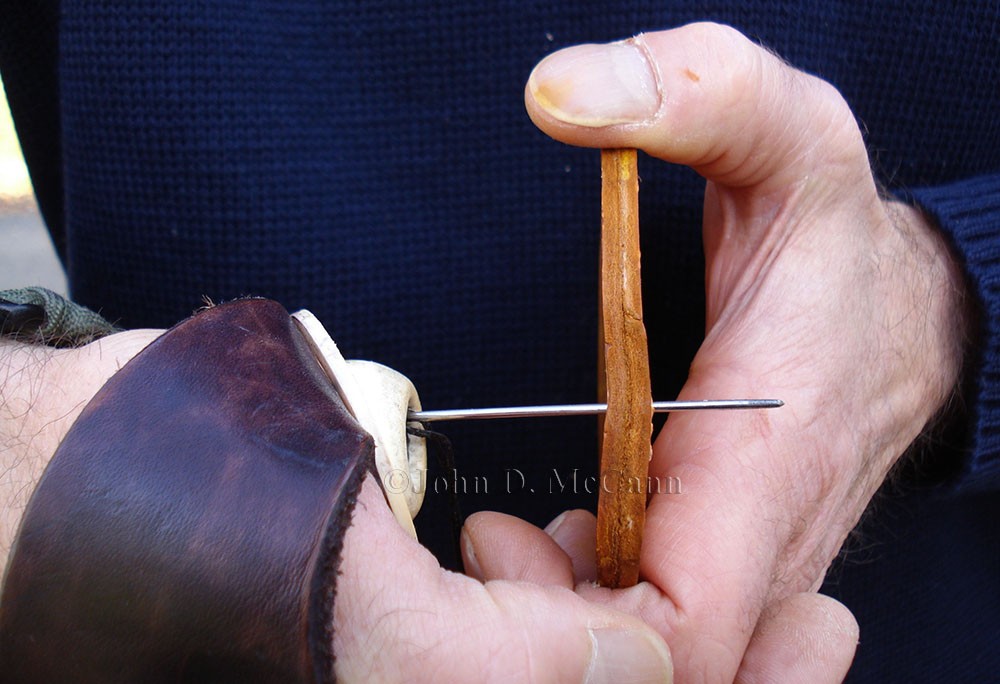 Using the Sewing Palm to push the needle through the stitch holes.
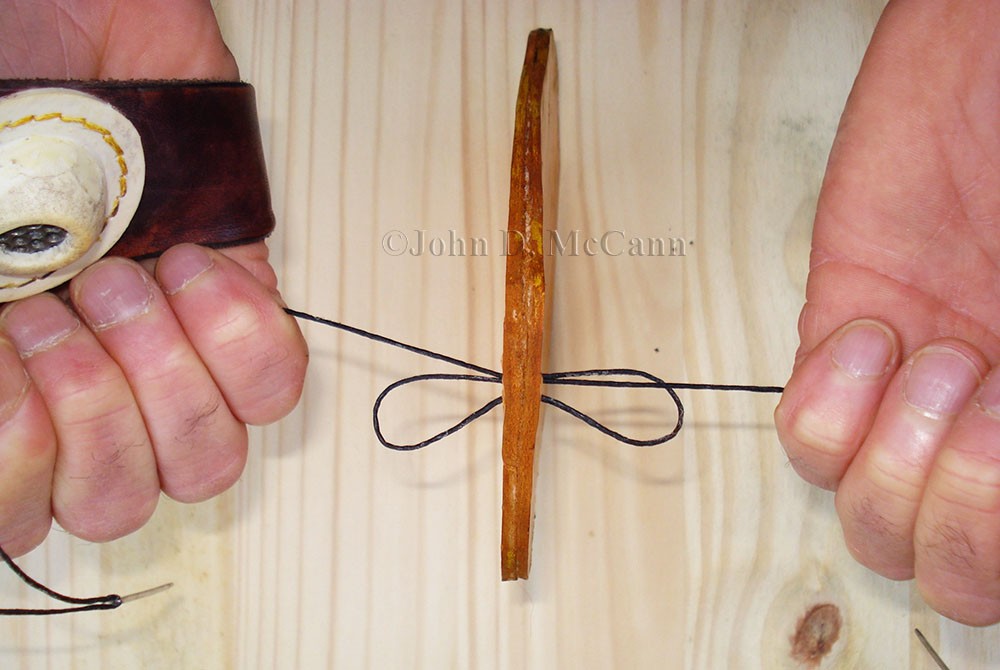 Pulling the thread firmly from both sides.
When you get to the end of your stitch holes, you need to backstitch a couple of stitches to lock the stitches. You do this by stitching back over the last two stitches in the opposite direction. It gets a little tight here pushing the needle through, but this is where the Sewing Palm really pays for itself! Carefully cut the remaining thread and move on to the next section and repeat.
 A view of one side of the holster with the stitching complete.
After the entire holster is stitched, take a break. The next part isn’t hard, but you need a couple of hours of steady work to mold the gun to the holster. The gun will be inserted into a wet holster, so you might want to wrap it in plastic or something, especially if it is blued. Don’t over wrap it as you will need to be able to feel all the indentations of the gun when molding.
OK… here we go. Take the holster and go to the sink and have some warm water running, very easy. Now pull open the area of the holster where the gun will be inserted and get it moist with water. You may need to push the water around with your hand. You want the leather wet, but not soaked. Now do the same thing to the outside of the holster. When the holster is wet, not soaked, and pliable, you need to carefully press the gun into the holster. Do this easy, making sure that it goes in square and that there is the same amount of leather on both sides. The extra one half thickness dimension added when you drew your template now comes into play. This is the extra amount that will mold around the sides of the gun. You want the same amount on the front and the back, or the gun will be crooked in the holster. Start working the leather with you hand, molding it around the gun
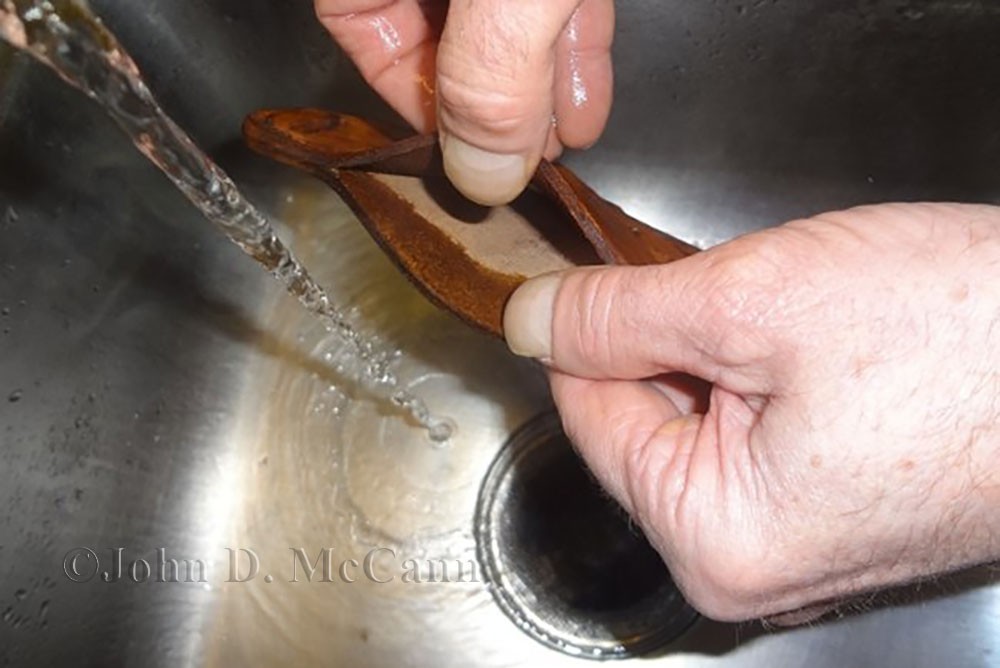 Wetting the inside of the holster.
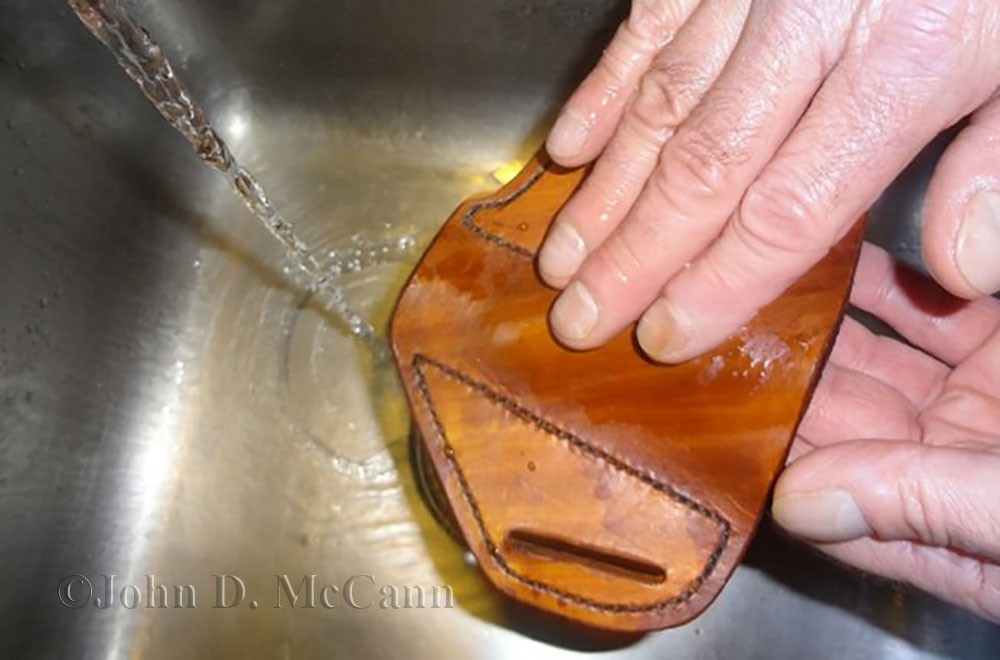 Wetting the outside of the holster.
 The gun is carefully pressed into the wet holster.
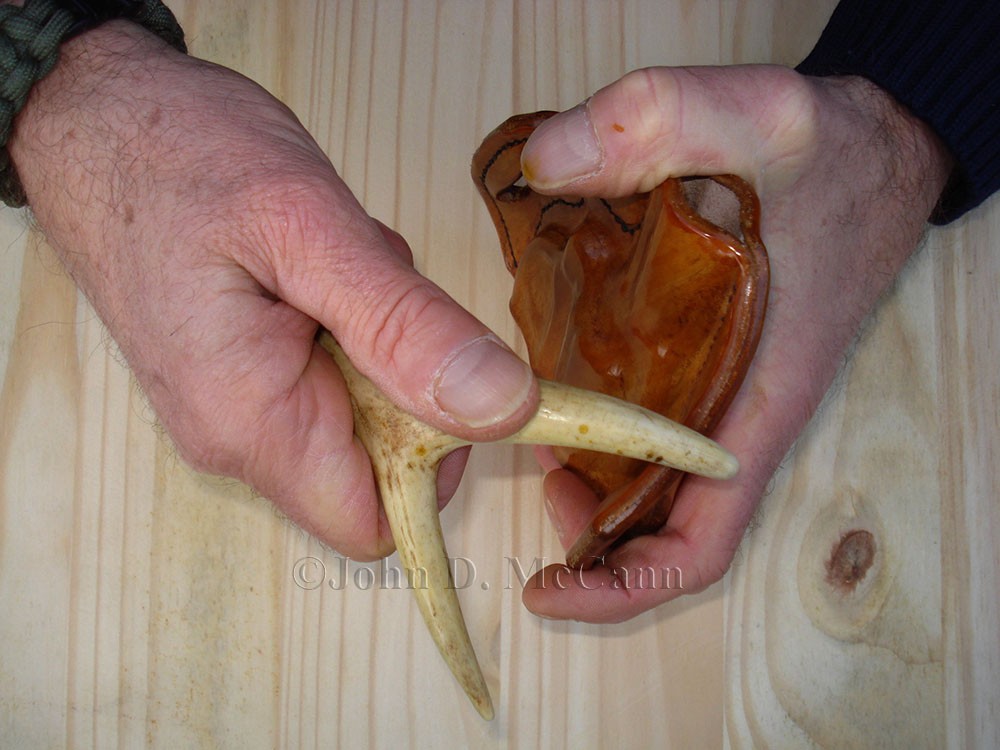
Now using a hard smooth object (I use a piece of deer antler… actually several different size pieces), you will start molding the specific shape of the gun into the holster. You might have to slide the gun out on various occasions so you can see the specific indentations. Then push the gun back in and continue to work the leather with the antler, or device you have selected. Work both the front and back of the holster and you should begin to see the actual shape of your gun. This is also the time to start molding the belt slots. You may want to put the holster on, with the gun in it, so it begins to mold to the shape on your belt. One the slots are bent correctly, take it off and continue molding.
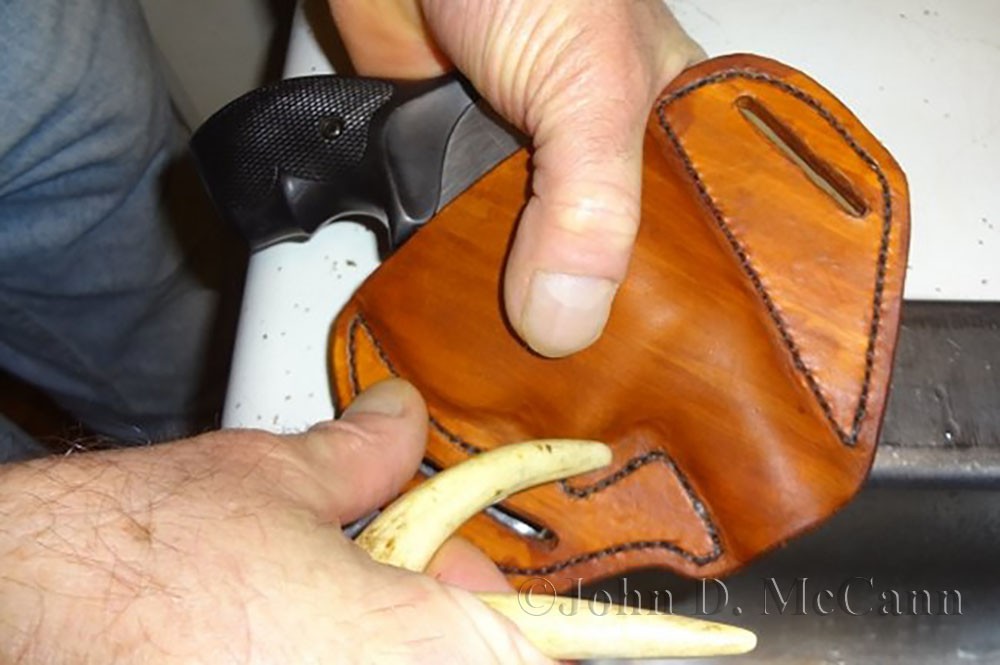 Start molding the leather to the gun with a smooth surface such as an antler.
As the leather starts to dry, but before it actually dries, you should start burnishing around the edges and on the front and back surfaces. Burnishing is rubbing back and forth with a firm pressure which smoothes out the finish of the leather. You need to work the leather at this point as the more you burnish, the smoother the finished holster.
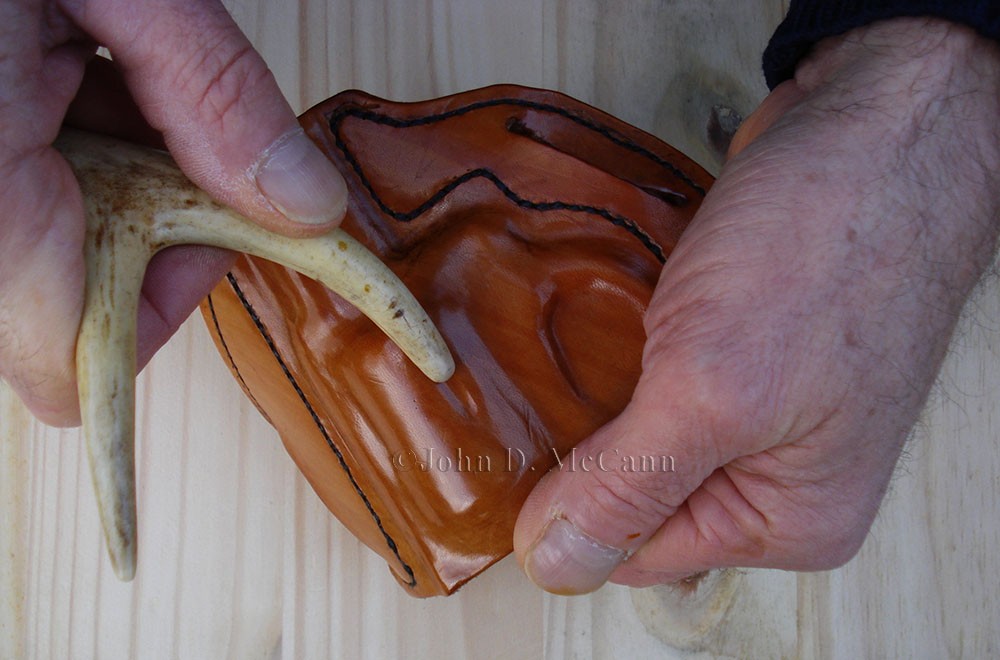 Burnishing the Top of the holster as it starts to dry.
 Burnishing the edge of the holster.
When your holster is complete, which means it meets your approval; you can rub it with some type of water resistant finish. I’ve tried various products and I find, for my needs, “KIWI” shoe polish works best. It is water resistant, protects the leather without softening it (you want the holster to remain stiff), and it provides a nice shine and finish when buffed.
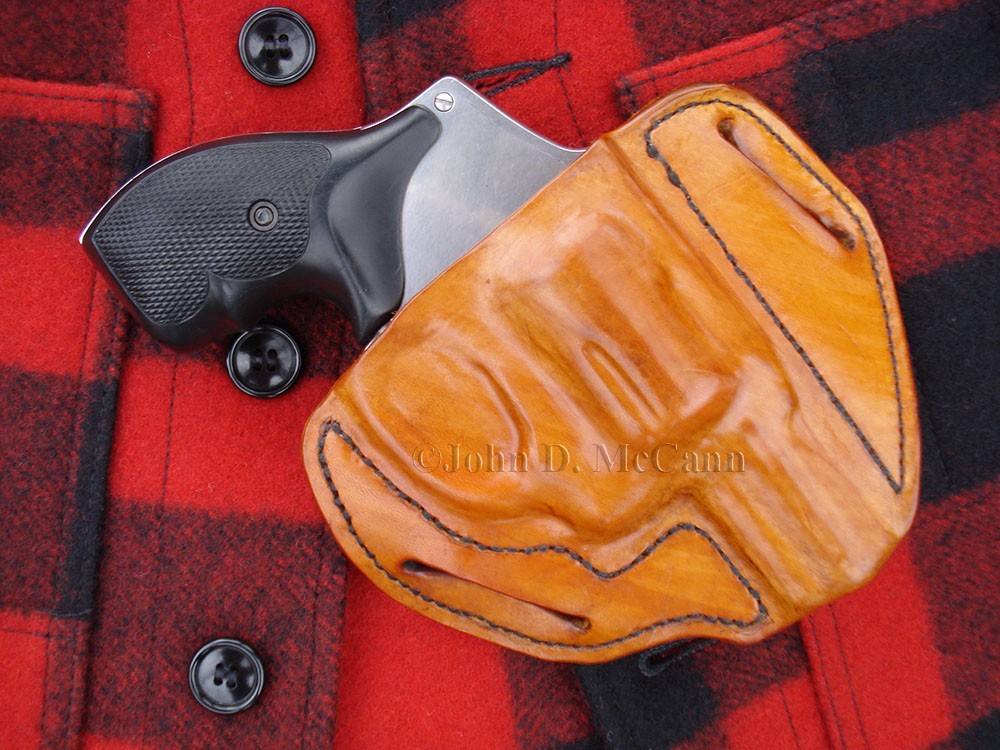 Close-up view of the front of the finished holster.
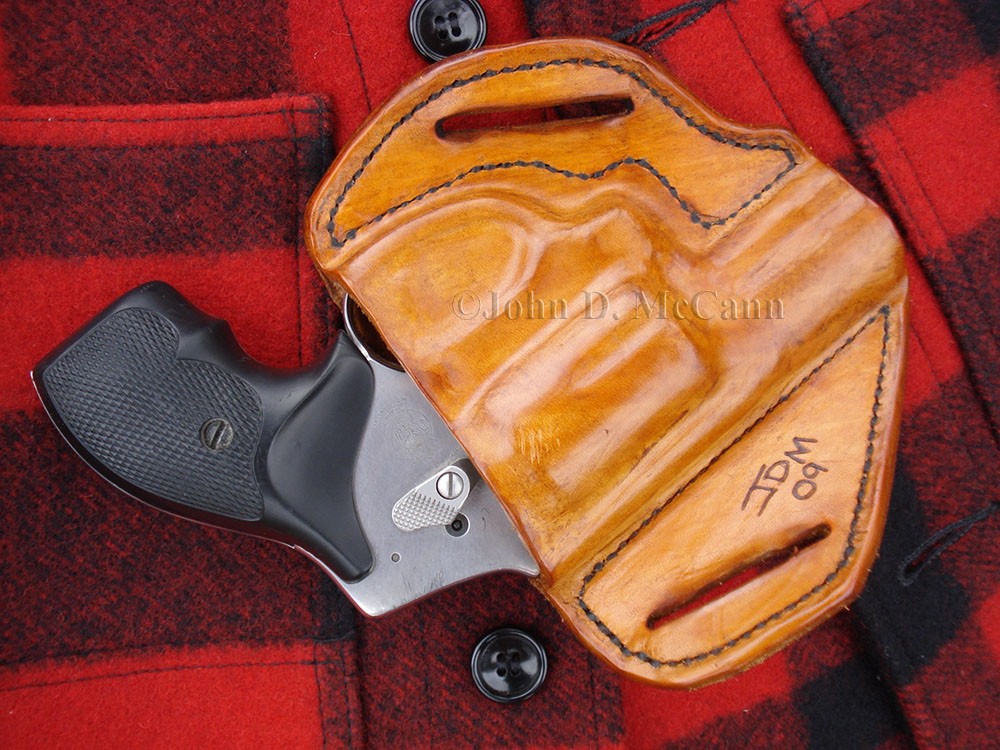 Close-up view of the back of the completed holster.
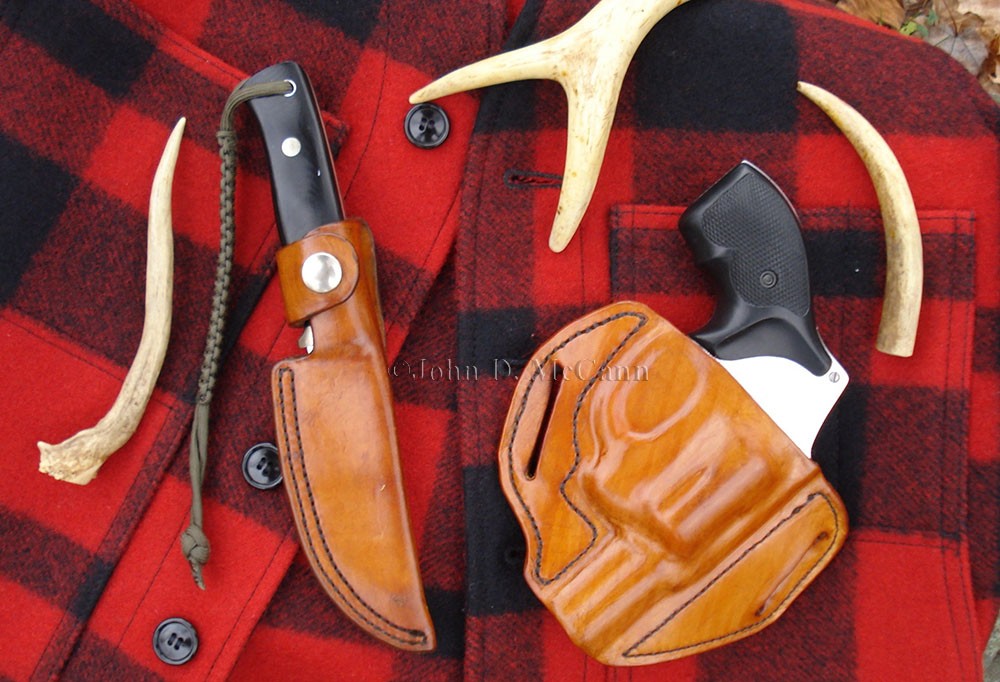 The completed sheath shown with the matching knife sheath.
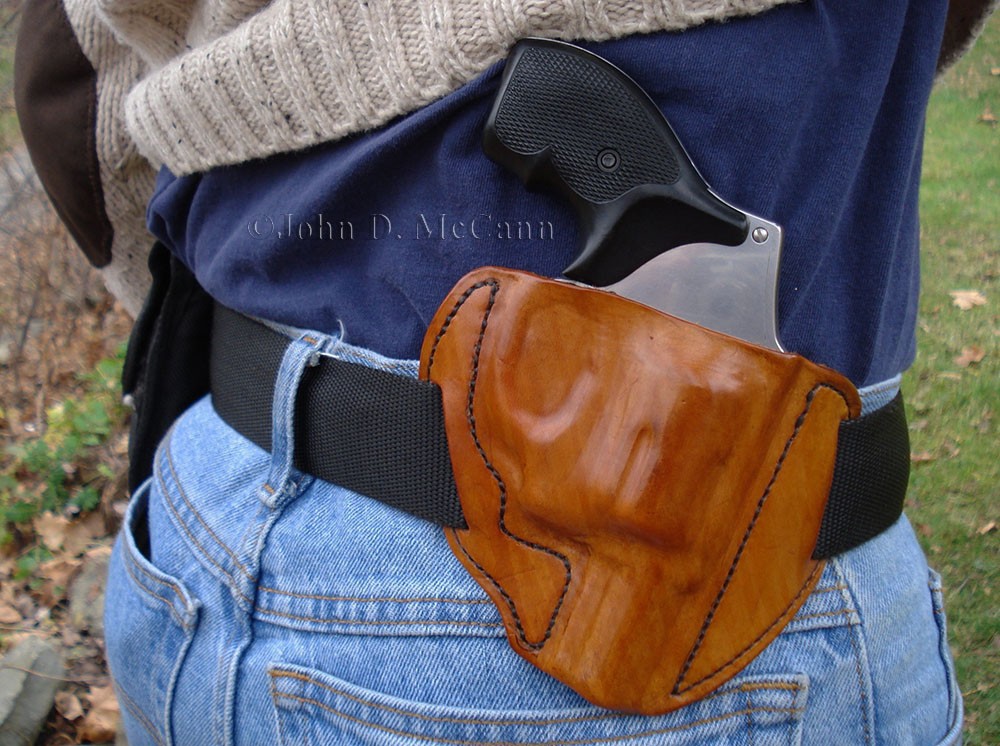 Finished holster shown being worn on my belt.
Well there you go, now you have the basics. Go out and buy some leather and basic tools and you will have a new skill, not only for yourself, but also as a tool for barter.
We hope you enjoyed this article and will help support our efforts by checking out our products. As always, Be Prepared To Survive!
Copyright © 2010 by John D. McCann